
Loading and Rendering 3D Meshes
This tutorial will guide you through the process of loading 3D models, applying textures, and rendering them in your Raftel Engine application.
Prerequisites
Before proceeding, make sure you:
- Have Raftel Engine installed on your system
- Are familiar with basic C++ programming
- Understand fundamental 3D graphics concepts
- Have completed the previous tutorials
Including the Required Headers
To work with meshes in Raftel Engine, start by including the necessary headers:
#include "raftel/mesh.hpp"This header provides access to all mesh-related functionality, including loading 3D models, creating primitive shapes, and managing material properties.
Setting Up the Window
First, let's set up a window to render our 3D meshes:
auto windowSystemOpt = Raftel::WindowSystem::make();
auto windowOpt = Raftel::Window::make("OBJ Loader Test", *windowSystemOpt);
if (!windowOpt) {
  std::cerr << "Error creating window.\n";
  return -1;
}
windowOpt->MakeContextCurrent();
Window Context
The MakeContextCurrent() method must be called before performing any rendering operations. This
establishes the OpenGL context for the current thread.
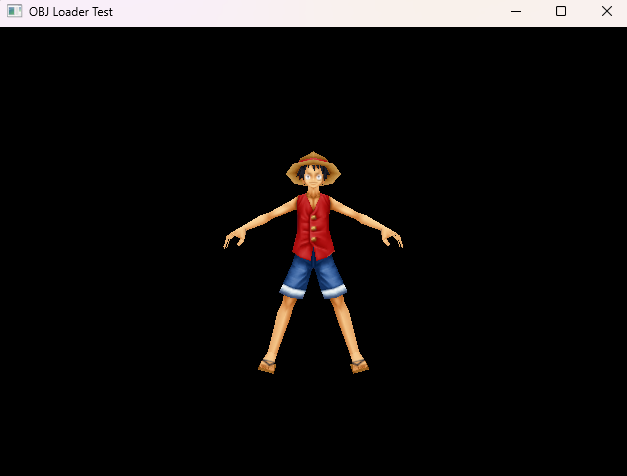
Loading a 3D Model
Raftel Engine supports loading various 3D model formats. Let's load a model from an OBJ file:
Raftel::Mesh myModel;
if (!myModel.loadMesh("../assets/obj/luffytrial.obj")) {
  std::cerr << "Error loading the initial mesh.\n";
  return -1;
}
Supported Formats
Raftel Engine currently supports the following 3D model formats:
- OBJ (.obj) - Wavefront Object format
- FBX (.fbx) - Autodesk FBX format
- STL (.stl) - StereoLithography o Standard Tessellation Language
- DAE (.dae) - Digital Asset Exchange
- GLB (.glb) - Binary version of GLTF
- GLTF (.gltf) - GL Transmission Format
Make sure your 3D models are in one of these supported formats.
Working with Materials (MTL Files)
Raftel Engine now supports Material Template Library (MTL) files commonly used with OBJ models. These files define material properties for your 3D models.
Using MTL Files
When loading an OBJ file that references an MTL file (using the mtllib directive), Raftel Engine will automatically:
- Load the referenced MTL file from the same directory as the OBJ file
- Parse material definitions and properties
- Apply materials to the appropriate submeshes based on
usemtldirectives
Make sure to keep your MTL files in the same directory as your OBJ files for proper loading.
// Load a model with its materials
auto shipModel = Raftel::Mesh::Create("../assets/models/ship-medium.obj");

// The MTL file (ship-medium.mtl) is automatically loaded
// No additional code needed to handle materials!

// You can still override specific material properties if needed
shipModel->GetMaterialByIndex(0)->setRoughness(0.7f);
Material Properties
The engine will parse and apply the following common MTL properties:
- Kd - Diffuse color (maps to albedo color)
- Ks - Specular color (influences metallic property)
- Ns - Specular exponent (maps to shininess and roughness)
- map_Kd - Diffuse texture map (albedo texture)
- map_Bump - Normal map texture
Applying Textures
To apply a texture to your loaded model, follow these steps:
auto luffy_t = Raftel::Texture::loadTexture("../assets/textures/luffytextrial.png");
myModel.GetMaterialByIndex(0)->setAlbedo(luffy_t);
myModel.setupMesh();
Materials and Submeshes
A 3D model may contain multiple submeshes, each with its own material. You can access these materials using their index. For a model with a single mesh, you can access its material using index 0.
After modifying any material properties, always call setupMesh() to apply the changes.
Setting Up Shaders
Shaders are essential for rendering meshes with the desired visual effects. Let's set up a basic shader program:
Raftel::ShaderProgram shaderProgram;
if (!shaderProgram.load("../assets/shaders/test.vs", "../assets/shaders/test.fs")) {
  std::cerr << "Error loading shaders.\n";
  return -1;
}
shaderProgram.use();
The shader program requires both a vertex shader (.vs) and a fragment shader (.fs) file. These files contain GLSL code that defines how vertices are transformed and how fragments (pixels) are colored.
Creating the Render Loop
Now that we have our model, texture, and shaders set up, let's create a render loop to display our 3D mesh:
while (!windowOpt->ShouldClose()) {
  windowOpt->clear();
  myModel.setUniforms(shaderProgram.GetProgramID());
  myModel.draw(shaderProgram);
  windowOpt->swapBuffers();
}
The render loop performs the following steps in each iteration:
- Clears the window's color and depth buffers
- Sets the uniform variables for the shader program
- Draws the model using the active shader program
- Swaps the front and back buffers to display the rendered frame
Creating Primitive Meshes
In addition to loading 3D models from files, Raftel Engine provides a MeshFactory to easily create
common primitive shapes:
// Create various primitive shapes
auto sphere = Raftel::MeshFactory::createSphere(30.0f, 50);
auto cube = Raftel::MeshFactory::createCube(30.0f);
auto plane = Raftel::MeshFactory::createPlane(10.0f, 20.0f);
auto terrain = Raftel::MeshFactory::createTerrain("../assets/heightmap/heightMap_test3.png", 1.0f, 200.0f, true);
Sphere
createSphere(float radius, int segments)
Creates a sphere with the specified radius and
resolution (segments).
Cube
createCube(float size)
Creates a cube with equal width, height, and depth dimensions.
Plane
createPlane(float width, float height)
Creates a flat rectangular surface with the
specified dimensions.
Terrain
createTerrain(string heightmapPath, float heightScale, float terrainSize, bool smoothing)
Creates
a terrain mesh from a heightmap image.
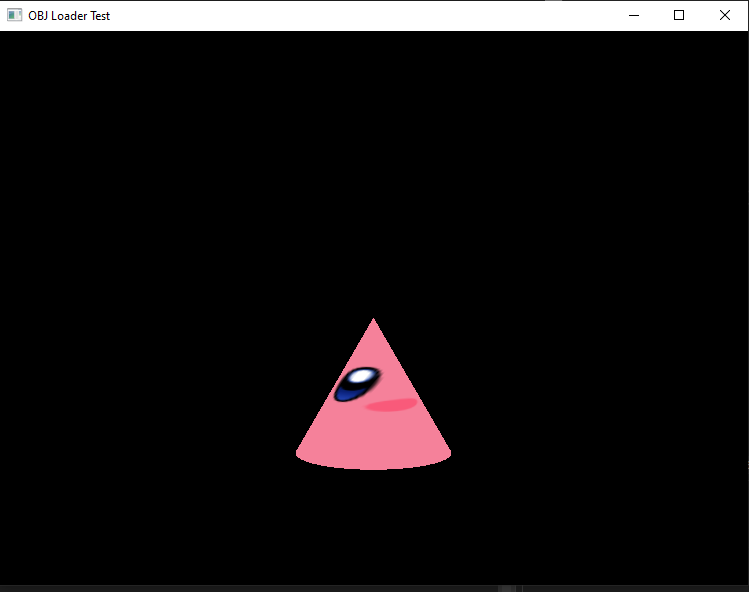
Cone
createCone(float radius, float height, int segments);
Creates
a cone mesh with the specific radius for base, height and resolution (segments).
Rendering Multiple Meshes
You can render multiple meshes in the same scene by drawing each one in sequence:
// Render loop with multiple meshes
while (!windowOpt->ShouldClose()) {
  windowOpt->clear();

  // Draw each mesh
  sphere->setUniforms(shaderProgram.GetProgramID());
  sphere->draw(shaderProgram);

  cube->setUniforms(shaderProgram.GetProgramID());
  cube->draw(shaderProgram);

  plane->setUniforms(shaderProgram.GetProgramID());
  plane->draw(shaderProgram);

  terrain->setUniforms(shaderProgram.GetProgramID());
  terrain->draw(shaderProgram);

  windowOpt->swapBuffers();
}
Optimizing Multiple Mesh Rendering
For better performance when rendering many meshes of the same type, consider using instanced rendering. This allows you to draw multiple instances of the same mesh with a single draw call.
Check the Instanced Rendering section in the API documentation for more details.
Complete Example
Here's a complete example that demonstrates loading and rendering a 3D mesh with texture:
#include "raftel/window.hpp"
#include "raftel/mesh.hpp"
#include "raftel/shader.hpp"
#include "raftel/texture.hpp"

int main() {
  // Initialize window system
  auto windowSystemOpt = Raftel::WindowSystem::make();
  auto windowOpt = Raftel::Window::make("Mesh Example", *windowSystemOpt);

  if (!windowOpt) {
    std::cerr << "Error creating window.\n";
    return -1;
  }

  windowOpt->MakeContextCurrent();

  // Load a 3D model
  Raftel::Mesh myModel;
  if (!myModel.loadMesh("../assets/obj/luffytrial.obj")) {
    std::cerr << "Error loading the mesh.\n";
    return -1;
  }

  // Apply texture
  auto texture = Raftel::Texture::loadTexture("../assets/textures/luffytextrial.png");
  myModel.GetMaterialByIndex(0)->setAlbedo(texture);
  myModel.setupMesh();

  // Setup shaders
  Raftel::ShaderProgram shaderProgram;
  if (!shaderProgram.load("../assets/shaders/test.vs", "../assets/shaders/test.fs")) {
    std::cerr << "Error loading shaders.\n";
    return -1;
  }

  // Main render loop
  while (!windowOpt->ShouldClose()) {
    windowOpt->clear();
    shaderProgram.use();
    myModel.setUniforms(shaderProgram.GetProgramID());
    myModel.draw(shaderProgram);
    windowOpt->swapBuffers();
  }

  return 0;
}
Next Steps
Now that you've learned to load and render 3D meshes, you might want to explore the following topics:
Implementing Lighting
Learn how to add dynamic lighting to your scenes for more realistic rendering.
Advanced Materials
Discover how to create PBR (Physically Based Rendering) materials for realistic surfaces.
Scene Management
Organize your 3D objects in a scene graph for easier manipulation and rendering.
Animation
Implement skeletal animation to bring your 3D characters to life.
For complete API details, see the Mesh Class Reference in the API documentation.