Entity Component System (ECS) in Raftel Engine
This tutorial introduces you to Raftel Engine's Entity Component System (ECS), a powerful architectural pattern that helps you organize your game objects and their behaviors in a flexible and efficient way.
What is an Entity Component System?
An Entity Component System (ECS) is a software architectural pattern that:
- Separates the data (components) from the objects (entities) that use them
- Promotes composition over inheritance to build complex objects
- Allows for more efficient memory layouts and better performance
- Makes it easier to add, remove, or modify behaviors at runtime
ECS Core Concepts
- Entities are unique identifiers that represent an object in your game world
- Components are pure data containers attached to entities
- Systems contain the logic that processes entities with specific component combinations
ECS Architecture in Raftel Engine
Raftel Engine implements a straightforward ECS approach that is both powerful and easy to use. The system consists of:
EntityManager
The central registry that creates and tracks entities, manages their components, and provides access to them.
Entity
A simple identifier (ID) with helper methods to manipulate its associated components.
Components
Data-only structures that define different aspects of an entity (transform, mesh, rendering, etc.).
Systems
Logic modules that process entities with specific component types (rendering, physics, etc.).
Creating an Entity Manager
To start using the ECS, you first need to create an EntityManager instance:
#include "raftel/ecs.hpp"

// Create an entity manager
auto ecs = std::make_unique();
The EntityManager is the heart of the ECS. It handles:
- Creating and tracking entities
- Managing component storage
- Providing access to entities and their components
Creating Entities
Once you have an EntityManager, you can create entities using the CreateEntity method:
// Create a new entity
Raftel::Entity entity = ecs->CreateEntity();

// Create multiple entities
Raftel::Entity player = ecs->CreateEntity();
Raftel::Entity enemy = ecs->CreateEntity();
Raftel::Entity terrain = ecs->CreateEntity();
Each entity has a unique ID that the EntityManager uses to track its components.
Understanding Components
Components in Raftel Engine are structures that hold specific data about an aspect of an entity. The engine provides several built-in component types:
TransformComponent
Defines the entity's position, rotation, and scale in the 3D world.
// TransformComponent structure
struct TransformComponent {
    glm::vec3 position;  // Position in world space
    glm::vec3 rotation;  // Rotation in degrees (Euler angles)
    glm::vec3 scale;     // Scale factors
    glm::mat4 transform; // Combined transformation matrix
};
MeshComponent
Associates a 3D mesh with the entity for rendering.
// MeshComponent structure
struct MeshComponent {
    std::weak_ptr mesh; // Weak pointer to a mesh
};
RenderComponent
Controls whether the entity should be rendered.
// RenderComponent structure
struct RenderComponent {
    bool visible; // Whether the entity is visible
};
LightComponent
Makes the entity act as a light source in the scene.
// LightComponent (simplified)
struct LightComponent {
    LightType type;    // DIRECTIONAL, POINT, SPOT
    glm::vec3 color;   // Light color
    float intensity;   // Light intensity
    // Other lighting parameters...
};
ScriptComponent
Attaches Lua scripts to entities for custom behaviors.
// ScriptComponent (simplified)
class ScriptComponent {
    lua_State* luaState;    // Lua scripting state
    std::string scriptCode; // Lua script source code
    bool enabled;           // Whether the script is active
};
BasicComponent
Provides a simple name attribute to identify entities.
// BasicComponent structure
struct BasicComponent {
    std::string name; // Name of the entity
};
Adding Components to Entities
To add components to an entity, use the appropriate add methods provided by the Entity class:
// Create an entity
Raftel::Entity entity = ecs->CreateEntity();

// Add a transform component
entity.addTransformComp({
    glm::vec3(0.0f, 0.0f, -10.0f),  // Position
    glm::vec3(0.0f, 0.0f, 0.0f),    // Rotation
    glm::vec3(1.0f, 1.0f, 1.0f)     // Scale
});

// Load a mesh
auto cubeMesh = Raftel::MeshFactory::createCube(2.0f);
auto texture = Raftel::Texture::loadTexture("../assets/textures/cubetex.png");
cubeMesh->GetMaterialByIndex(0)->setAlbedo(texture);
cubeMesh->setupMesh();

// Add a mesh component
entity.addMeshComp(cubeMesh);

// Add a render component (visible)
entity.addRenderComp(true);

// Add a light component (optional)
entity.addLightComp(Raftel::LightComponent(
    Raftel::LightComponent::LightType::POINT,
    glm::vec3(1.0f, 0.8f, 0.6f),    // Color
    1.0f,                           // Intensity
    50.0f,                          // Range
    15.0f,                          // Inner cone angle
    30.0f,                          // Outer cone angle
    windowOpt->getScreenSize()      // Screen size for shadow mapping
));
Component Storage Approach
Raftel Engine uses std::optional to store components. This allows for:
- Efficient component presence checks
- Easy addition and removal of components
- Safe access to component data
- Clear ownership semantics
Checking for Components
You can check if an entity has a specific component using the following methods:
// Check if the entity has various components
if (entity.hasTransformComp()) {
    // Entity has a transform component
}

if (entity.hasMeshComp()) {
    // Entity has a mesh component
}

if (entity.hasRenderComp()) {
    // Entity has a render component
}

if (entity.hasLightComp()) {
    // Entity has a light component
}

if (entity.hasScriptComp()) {
    // Entity has a script component
}
Accessing and Modifying Components
You can access and modify an entity's components with the corresponding getter methods:
// Access transform component
if (auto transformOpt = entity.getTransformComp()) {
    // Modify position
    transformOpt->position.x += 1.0f;

    // Modify rotation
    transformOpt->rotation.y += 45.0f;

    // Modify scale
    transformOpt->scale = glm::vec3(2.0f);

    // Update the transformation matrix
    transformOpt->Update();
}

// Access mesh component
if (auto meshOpt = entity.getMeshComp()) {
    // Access the mesh
    if (auto mesh = meshOpt->mesh.lock()) {
        // Modify mesh properties
        // ...
    }
}

// Access light component
if (auto lightOpt = entity.getLightComp()) {
    // Modify light color
    lightOpt->color = glm::vec3(1.0f, 0.0f, 0.0f);  // Change to red

    // Modify light intensity
    lightOpt->intensity = 2.0f;
}
Working with Optional Components
Always check if a component exists before trying to access it. Since components are stored as std::optional, you should use conditional access patterns to avoid undefined behavior.
Manipulating Entities Through Helper Methods
The Entity class provides convenient helper methods to manipulate common properties without directly accessing components:
// Move entity to a specific position
entity.setPosition(glm::vec3(10.0f, 5.0f, -20.0f));

// Get current position
glm::vec3 position = entity.getPosition();

// Set rotation
entity.setRotation(glm::vec3(0.0f, 45.0f, 0.0f));

// Get current rotation
glm::vec3 rotation = entity.getRotation();

// Set scale
entity.setScale(glm::vec3(2.0f, 2.0f, 2.0f));

// Get current scale
glm::vec3 scale = entity.getScale();

// Move entity towards a target position at a given speed
entity.moveTo(glm::vec3(20.0f, 0.0f, 0.0f), 5.0f);
Systems in Raftel Engine
Systems in Raftel Engine process entities with specific component combinations. The engine includes several built-in systems:
RenderSystem
Renders entities with mesh and transform components using the appropriate shaders.
TransformSystem
Updates the transformation matrices of entities based on their position, rotation, and scale.
ScriptingSystem
Executes Lua scripts attached to entities with script components.
LightSystem
Processes light components and applies lighting effects to the scene.
The RenderSystem is the most commonly used system and can be accessed through static methods:
// Initialize the RenderSystem
Raftel::RenderSystem::Initialize();

// In your main loop:
while (!windowOpt->ShouldClose()) {
    // Update input, camera, etc.
    // ...

    // Clear the window
    windowOpt->clear();

    // Process and render all entities with the necessary components
    Raftel::RenderSystem::UpdateRenderSystem(*ecs, camera, windowOpt->getScreenSize(), false);

    // Swap buffers
    windowOpt->swapBuffers();
}
Entity Selection and Interaction
Raftel Engine provides a utility function for selecting entities through ray-casting from the mouse position:
// Get mouse position from input
glm::vec2 mousePos = windowOpt->input->getMousePosition();

// Perform picking ray-cast
int selectedEntityIndex = Raftel::pickEntity(ecs, camera, mousePos, windowOpt->getScreenSize());

// Check if an entity was selected
if (selectedEntityIndex >= 0) {
    // Get the selected entity
    Raftel::Entity& selectedEntity = ecs->getActiveEntities()[selectedEntityIndex];

    // Do something with the selected entity
    // ...
}
Practical Example: Creating a Dynamic Scene
Let's put everything together to create a dynamic scene with multiple entities that move around:
#include "raftel/window.hpp"
#include "raftel/mesh.hpp"
#include "raftel/texture.hpp"
#include "raftel/shader.hpp"
#include "raftel/ecs.hpp"
#include "raftel/camera.hpp"
#include "raftel/systems.hpp"

int main() {
    // Initialize window
    auto windowSystemOpt = Raftel::WindowSystem::make();
    auto windowOpt = Raftel::Window::make("ECS Example", *windowSystemOpt);

    if (!windowOpt) {
        std::cerr << "Error creating window.\n";
        return -1;
    }

    windowOpt->MakeContextCurrent();

    // Create camera
    Raftel::Camera camera(windowOpt.get());
    camera.SetPosition(glm::vec3(0.0f, 10.0f, 30.0f));

    // Create entity manager
    auto ecs = std::make_unique();

    // Initialize render system
    Raftel::RenderSystem::Initialize();

    // Load meshes and textures
    auto cubeMesh = Raftel::MeshFactory::createCube(2.0f);
    auto sphereMesh = Raftel::MeshFactory::createSphere(1.0f, 20);

    auto cubeTexture = Raftel::Texture::loadTexture("../assets/textures/cubetex.png");
    cubeMesh->GetMaterialByIndex(0)->setAlbedo(cubeTexture);
    cubeMesh->setupMesh();

    auto sphereTexture = Raftel::Texture::loadTexture("../assets/textures/earth.png");
    sphereMesh->GetMaterialByIndex(0)->setAlbedo(sphereTexture);
    sphereMesh->setupMesh();

    // Create entities
    std::vector entities;

    // Create a central sphere
    auto centralEntity = ecs->CreateEntity();
    centralEntity.addMeshComp(sphereMesh);
    centralEntity.addTransformComp({
        glm::vec3(0.0f, 0.0f, 0.0f),       // Position
        glm::vec3(0.0f, 0.0f, 0.0f),       // Rotation
        glm::vec3(3.0f, 3.0f, 3.0f)        // Scale
    });
    centralEntity.addRenderComp(true);

    // Create orbiting cubes
    for (int i = 0; i < 10; i++) {
        auto entity = ecs->CreateEntity();
        entity.addMeshComp(cubeMesh);

        // Calculate initial position in a circle
        float angle = (float)i / 10.0f * glm::two_pi();
        float radius = 15.0f;
        float x = radius * cos(angle);
        float z = radius * sin(angle);

        entity.addTransformComp({
            glm::vec3(x, 0.0f, z),                     // Position
            glm::vec3(0.0f, 0.0f, 0.0f),               // Rotation
            glm::vec3(1.0f, 1.0f, 1.0f)                // Scale
        });
        entity.addRenderComp(true);

        entities.push_back(entity);
    }

    // Add a directional light
    auto lightEntity = ecs->CreateEntity();
    lightEntity.addLightComp(Raftel::LightComponent(
        Raftel::LightComponent::LightType::DIRECTIONAL,
        glm::vec3(1.0f, 1.0f, 1.0f),       // White light
        1.0f, 100.0f, 20.0f, 30.0f,
        windowOpt->getScreenSize()
    ));
    lightEntity.addTransformComp({
        glm::vec3(50.0f, 50.0f, 50.0f),    // Position
        glm::vec3(45.0f, 45.0f, 0.0f),     // Direction (via rotation)
        glm::vec3(1.0f, 1.0f, 1.0f)        // Scale
    });

    // Main loop
    float time = 0.0f;
    while (!windowOpt->ShouldClose()) {
        windowOpt->input->updateKeys();

        // Update time
        time += 0.01f;

        // Update camera
        camera.PresetCamera(windowOpt.get());
        camera.Update(windowOpt);

        // Update orbiting entities
        for (size_t i = 0; i < entities.size(); i++) {
            if (auto transform = entities[i].getTransformComp()) {
                // Update position to orbit around center
                float angle = (float)i / (float)entities.size() * glm::two_pi() + time;
                float radius = 15.0f;
                float x = radius * cos(angle);
                float z = radius * sin(angle);
                float y = 2.0f * sin(time * 0.5f + (float)i);  // Add some vertical movement

                transform->position = glm::vec3(x, y, z);

                // Rotate the cube
                transform->rotation.y += 1.0f;
                transform->rotation.x += 0.5f;

                // Update the transformation matrix
                transform->Update();
            }
        }

        // Rotate the central sphere
        if (auto transform = centralEntity.getTransformComp()) {
            transform->rotation.y += 0.2f;
            transform->Update();
        }

        // Clear window and render
        windowOpt->clear();
        Raftel::RenderSystem::UpdateRenderSystem(*ecs, camera, windowOpt->getScreenSize(), false);
        windowOpt->swapBuffers();
    }

    return 0;
}
This example creates a scene with:
- A central sphere representing a planet
- Multiple cubes orbiting around the sphere
- A directional light to illuminate the scene
- Camera controls for interactive viewing
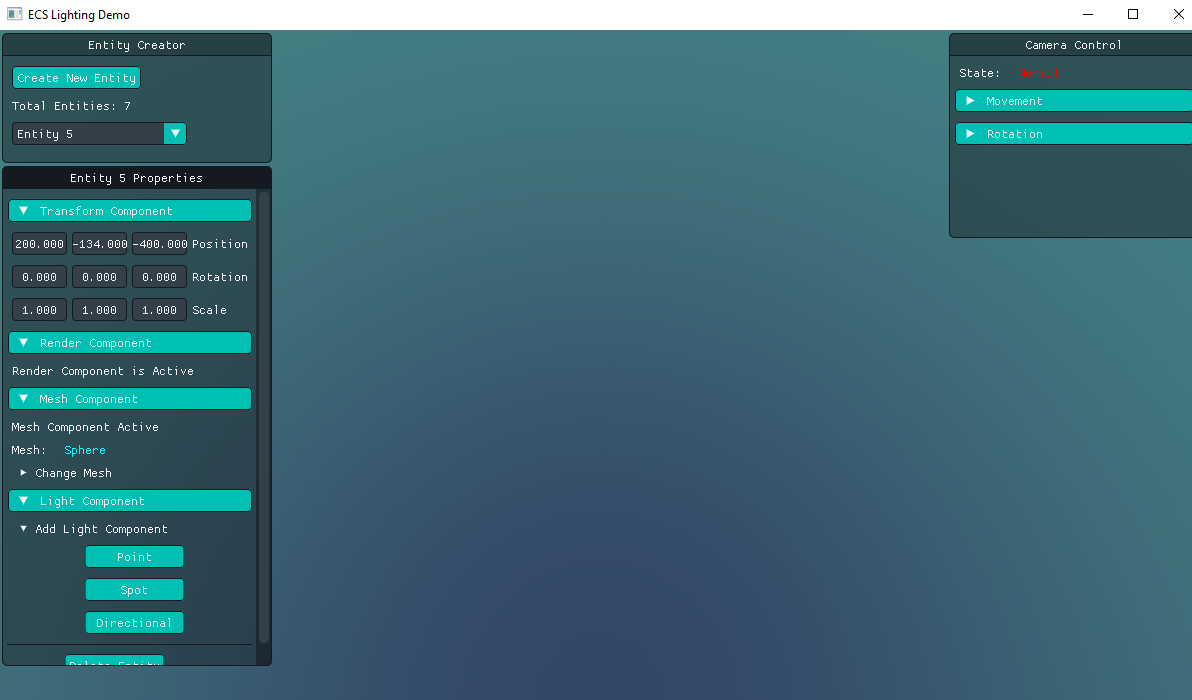
Using the Editor with ImGui
Raftel Engine includes a powerful editor built with ImGui that allows you to inspect and modify entities and their components at runtime. The Editor class provides a visual interface for managing your ECS.
#include "raftel/imguiRenderer.hpp"
#include "raftel/imguiWindows.hpp"

// Initialize ImGui renderer
Raftel::imguiRenderer ImguiWindow(windowOpt->window_);

// Create editor instance
Raftel::Editor editor;

// Main loop
while (!windowOpt->ShouldClose()) {
    // Update input and clear window
    windowOpt->input->updateKeys();
    windowOpt->clear();

    // Update camera
    cam.PresetCamera(windowOpt.get());
    cam.Update(windowOpt);

    // Render your scene
    Raftel::RenderSystem::UpdateRenderSystem(*ecs, cam, windowOpt->getScreenSize(), true);

    // Begin ImGui frame
    ImguiWindow.newFrame();

    // Display the editor UI
    editor.Show(cam, *ecs);

    // Add your custom ImGui windows here
    // ImGui::Begin("My Custom Window");
    // ImGui::Text("Hello from ImGui!");
    // ImGui::End();

    // End ImGui frame
    ImguiWindow.endFrame();

    // Swap buffers
    windowOpt->swapBuffers();
}
Important Note About ImGui
When using ImGui in Raftel Engine, always place your ImGui code between ImguiWindow.newFrame() and ImguiWindow.endFrame() calls. This includes:
- The editor UI with
editor.Show(cam, *ecs) - Any custom ImGui windows or controls you want to add
- Debug displays, property editors, and other UI elements
Failing to maintain this order will result in rendering errors or crashes.
ImGui Credits
Raftel Engine's editor UI is built using Dear ImGui, an immediate-mode graphical user interface library created by Omar Cornut. Dear ImGui is a powerful, lightweight UI system designed specifically for game development and content creation tools.
Best Practices
Tips for Working with ECS
- Component Composition: Design entities as collections of components rather than trying to build complex inheritance hierarchies.
- Component Access: Always check if a component exists before accessing it using conditional patterns.
- System Separation: Keep systems focused on processing specific component combinations rather than creating monolithic update methods.
- Performance Considerations: For large numbers of entities, consider organizing them by component types to optimize system iterations.
- Memory Management: Use smart pointers (like
std::shared_ptr) for resources that entities share, such as meshes and textures. - Component Updates: Remember to call
Update()on TransformComponent after modifying position, rotation, or scale.
Advanced ECS Techniques
Entity Relationships
To create parent-child relationships between entities, you can implement a hierarchy component that tracks these relationships and updates transformations accordingly.
Custom Components
You can extend the ECS by creating your own component types. Simply define a struct or class with your data and add it to the EntityManager's component storage.
Custom Systems
For specialized behaviors, you can create your own systems that process entities with specific component combinations according to your game's needs.
Entity Tags and Layers
Implement tagging systems using components to categorize entities for filtering and selective processing in your systems.
API Reference
For complete details on the ECS API, see the following classes in the API documentation: